In this guide · 10 sections
- Find your match
- At a glance
- The priority order: where the money actually matters
- Sizing youth gear: the three measurements that matter
- What NOT to spend on at 9U–12U
- Care and maintenance: gear that survives (and resells)
- The upgrade ladder: from first set to 14U
- The gear is the body armor — the brain comes from reps
- Also worth a look
- FAQ
Quick picks
Our top recommendations — full reviews below.
Key takeaways
- Fit beats brand: gear that's even one size loose teaches bad blocking habits and shakes loose mid-game.
- Buy the set first, upgrade pieces later — a quality youth set ($120–$200) covers seasons one and two.
- The mitt is the one piece worth buying separately and breaking in properly.
- Hockey-style masks dominate youth ball for a reason: easier sizing, better protection coverage, faster to ditch on pop-ups.
- Realistic season-one budget: $200–$300 all-in (set + mitt + throat guard). Upgrades come in season two, if the kid sticks.
- Measure, don't guess: torso (collarbone to navel) and knee-to-ankle beat the age label on every box.
Catcher is the most gear-intensive position in youth sports, and the most expensive seat in the dugout. Parents face a wall of choices — set vs pieces, hockey-style vs traditional mask, 31" vs 32.5" mitt — usually the week before the season starts.
Here's the honest framework: at 9U–12U, protection and fit are everything, brand prestige is nothing, and growth means you're re-buying within two seasons no matter what. Spend where safety and skill development live (helmet, mitt fit), save where kids outgrow before they wear out (chest protector, leg guards). Below is the full kit in priority order.
⚾ 30-second match
Which one is right for you?
Answer 2–3 quick questions and we'll match you to the best pick from this guide — for your budget, level and what matters most, with the reasons it fits.
At a glance
| Pick | Best for | Price* | ||
|---|---|---|---|---|
| Complete Youth Catcher's Set | The whole kit, sized right, in one box | ~$120–$200 | View → | |
| Hockey-Style Catcher's Helmet | The first piece worth upgrading | ~$92 | View → | |
| Youth Catcher's Mitt (31"–32.5") | The skill piece — buy it separately | ~$58 | View → | |
| Knee Savers | Saving young knees on long weekends | ~$33 | View → | |
| Wheeled Catcher's Equipment Bag | Hauling 20 lbs of gear without hating life | ~$60 | View → | |
| Throat Guard (Dangling) | The $12 piece many leagues require | ~$15 | View → |
*Prices at time of writing — they move; check the listing.

Complete Youth Catcher's Set
~$120–$200
For a first- or second-year catcher, a complete age-sized set (helmet, chest protector, leg guards) from a reputable maker beats piecing together adult hand-me-downs every time. Sets are sized as a system — the chest protector ends where the leg guards begin — and youth sets from the major brands all meet current NOCSAE standards.
Age bands (9–12, 12–16) vary by brand — measure torso length (collarbone to navel) and knee-to-ankle rather than trusting the age label alone. When the measurements straddle two sizes, take the smaller one: youth gear has generous strap adjustment upward, and snug gear moves with the body during blocks instead of arriving a beat late.
What the box doesn't tell you: strap fit is a learned skill. Spend ten minutes before the first practice dialing in every strap with the kid in a crouch — not standing — because gear that fits standing up gaps in the squat, which is where catchers live. Mark the strap positions with a paint pen so re-gearing between innings takes seconds.
Resale reality is the quiet win of buying quality: name-brand youth sets in good condition move fast in team groups and local marketplaces, routinely recovering a third to half the price. Buy the reputable set, keep the straps and padding clean, and season three's upgrade partially funds itself.
- Sized as a matched system
- Meets youth safety standards out of the box
- Cheaper than piecing it together
- Strong resale/hand-down market
- Mid-grade materials across the board
- Outgrown in ~2 seasons
- Set helmets are decent, not great

Hockey-Style Catcher's Helmet
~$92
If you upgrade one piece out of the set, it's the helmet. A dedicated hockey-style mask fits the head precisely (many use adjustable liners), covers the back of the skull and the throat angle better than budget set-helmets, and comes off in one motion for pop-ups.
Check for the NOCSAE stamp — required at most levels — and prioritize a model with replaceable padding so a sweaty season doesn't end the helmet. Ventilation matters more than parents expect: July doubleheaders behind the plate are brutal, and the difference between a vented shell and a budget oven is a catcher who's still sharp in game three.
Owners report the wear points are padding and hardware, not the cage: foam compresses after a season or two of sweat, and replaceable-liner models come back to day-one fit for the cost of a pad kit. Buy the helmet in a lighter color if your summers are serious — dark shells measurably cook — and it carries a catcher from 10U into high school sizing.
- Best protection per dollar in the kit
- Precise fit via adjustable liners
- One-motion removal on pop-ups
- Replaceable padding extends life
- Quality ones cost as much as half a set
- Sizing between brands is inconsistent — measure
- Dark colors cook in summer

Youth Catcher's Mitt (31"–32.5")
~$58
The mitt is where gear actually touches skill development. A youth catcher needs a youth-pattern mitt — 31" to 32.5" for most 9U–13U hands — because an adult 34" mitt swallows small hands and teaches scooping instead of receiving.
This is also the piece that survives growth: a well-kept mitt serves 2–3 seasons and holds real resale value, so quality leather here pays off in a way set-gear doesn't. The sizing test is simple and worth doing in person — the kid should be able to close the mitt one-handed around a ball on day one. If they can't, it's too big or too stiff, no matter what the label says.
One budgeting note: families often blow the whole budget on the set and grab the cheapest mitt left over — exactly backwards. The set protects; the mitt performs. A mid-tier set plus a proper youth-pattern mitt beats a premium set plus a bargain-bin glove on every pitch your catcher receives. (Our full mitt guide ranks the specific models worth buying.)
- Directly affects receiving and framing skill
- Youth patterns sized for real hands
- Quality leather outlasts the growth cycle
- Best resale of any kit piece
- Break-in takes genuine effort
- Easy to buy too big ('he'll grow into it' — don't)
- Top leather gets pricey

Knee Savers
~$33
Wedge pads that strap to the leg-guard hinge and support the catcher in a deep squat. The debate about pro usage aside, for a youth catcher squatting four games in a weekend they reduce fatigue dramatically — and a less-fatigued catcher blocks better in game four than a gassed one.
Fit them to the leg guards (sizes follow guard size), and teach the catcher they're a rest between pitches, not a posture to receive from with runners on. Coaches who like them frame it exactly that way: relax onto the wedges with bases empty, up and athletic the moment a runner reaches.
Parents consistently call these the best $33 of the season for tournament kids — the Sunday-knee complaints simply stop. They're also the most commonly handed-down accessory in the dugout, since they fit a wide size range and outlast several sets of leg guards.
- Noticeably less knee fatigue on tournament weekends
- Cheap insurance for a high-wear joint
- Fits most leg guards
- Easy on/off
- Can encourage lazy stance if uncoached
- Another strap to manage
- Some leagues' coaches dislike them — ask

Wheeled Catcher's Equipment Bag
~$60
Catcher's gear weighs roughly triple a position player's bag, and someone has to haul it across a 5-field complex in July. A wheeled bag built for catcher's dimensions — full gear + mitt + helmet + bat compartment — is the difference between a kid (or parent) who shows up fresh and one who's already sweated through warm-ups.
Look for: real wheels (curb-sized, not luggage casters), a vented main compartment so soaked gear can breathe, and a fence hook for dugout hanging. The vented compartment is the sleeper feature — sealed bags turn Saturday's sweat into Sunday's mildew, and gear that breathes overnight lasts seasons longer and smells dramatically less like a hockey locker room.
Long-term owners report wheels and zippers as the failure points, in that order — which is why paying for real wheels up front matters. A quality wheeled bag routinely outlives two sets of gear; it's infrastructure, not an accessory.
- Wheels. On gravel. Bless.
- Vented compartments fight the gear stink
- Fence hooks for organized dugouts
- Kid can haul their own gear = ownership
- Big bags get TSA'd by team moms for snacks
- Cheap wheels die on gravel within a season
- Pricier than a duffel
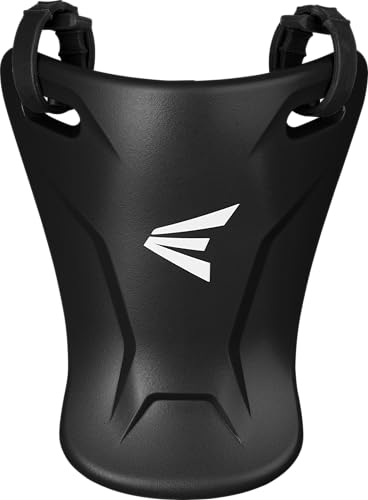
Throat Guard (Dangling)
~$15
A dangling throat protector bolts to the mask in five minutes and covers the gap every catcher's gear leaves: the exposed throat under the chin on deflected balls. Many leagues and tournament rule sets require one on hockey-style masks; even where optional, it's the cheapest meaningful protection upgrade in the sport.
Buy the size matched to the mask, check the mounting holes exist on your helmet model, and replace the zip-ties or screws each season. Most hockey-style helmets have pre-drilled mounting points along the chin edge — if yours doesn't, the guard's hardware kit usually includes lacing options that work on the cage itself.
At this price, buy two: one mounted, one in the bag. Mounting hardware fails at tournament check-in more often than anyone expects, and some events won't let a catcher take the field without one.
- Real protection for $12
- Required by many leagues anyway
- Universal fit on most masks
- 5-minute install
- Slight bounce takes a game to ignore
- Cheap mounting hardware — replace yearly
- Easy to forget until a rules check
The priority order: where the money actually matters
When the budget is finite — and it always is — spend in this order: 1) Helmet fit, because head protection is non-negotiable and a loose lid is the worst failure in the kit. 2) Mitt fit and break-in, because it's the only piece that develops skill rather than just absorbing impact. 3) The set (chest protector + leg guards), where mid-grade youth gear genuinely does the job. 4) Throat guard, mandatory-cheap. 5) Everything else — knee savers, bag, accessories — as the season proves the kid is staying behind the plate.
The corollary: when re-buying for growth, the same order applies. A catcher who's outgrown everything at once gets the new helmet and mitt first, and finishes the season with slightly-snug leg guards if it comes to that.
Sizing youth gear: the three measurements that matter
Skip the age label; take three measurements with a soft tape. Hat size / head circumference above the ears → helmet size. Torso, collarbone to navel → chest protector length (the protector should end at the belt line in a crouch, not bunch into the thighs). Knee-to-ankle, kneecap center to ankle bone → leg guard size (the knee cup must sit ON the kneecap in a squat; guards that ride low expose the knee exactly when it's planted).
- Between sizes on the chest protector → size down; straps adjust up.
- Between sizes on leg guards → match the knee cup position first; length second.
- Re-measure every off-season — a winter growth spurt quietly resizes everything.
What NOT to spend on at 9U–12U
Pro-model gear in youth sizes (paying for a name on equipment outgrown in 18 months), custom paint and decals (gorgeous, zero function), and multiple mitts (one well-broken-in mitt beats a rotation). Put the savings toward lessons, a tee, or the helmet upgrade — those compound; cosmetics don't.
The other money pit is duplicate "comfort" accessories before fit is solved: a $40 padded anything can't fix a chest protector that's a size too long. Solve fit first with the measurements above; add comfort gear only for the problems that remain.
Care and maintenance: gear that survives (and resells)
Catcher's gear dies of moisture and neglect, not innings. The routine that keeps it alive: air everything out the same night — gear left sealed in the bag is how padding sours and straps rot. Hang it on a drying rack or fence-dry it; never radiator- or dryer-dry padding. Wipe shells monthly with mild soap and water, and check strap stitching and helmet hardware while you're there. Condition the mitt lightly every 6–8 weeks in season. And store the off-season kit indoors — garage heat cycles crack foam and leather alike.
This is also the resale playbook: clean, intact-strapped, odor-free youth gear recovers a third to half its price in team groups every spring. Twenty minutes a week of care is the highest-yield "gear purchase" on this page.
The upgrade ladder: from first set to 14U
Season one: the complete set + a youth-pattern mitt + throat guard, ~$200–$300 all-in. Season two (kid sticks): upgrade the helmet to a dedicated hockey-style lid, add knee savers and the wheeled bag as the tournament schedule grows. Seasons three and four: replace the outgrown set piece-by-piece with intermediate sizes — this is when buying chest protector and leg guards separately starts beating sets, because the kid's proportions have opinions now. 14U and up: high-school-spec gear, a step-up mitt, and the realization that the resale pile from the earlier rungs funds a real chunk of it.
The gear is the body armor — the brain comes from reps
A perfectly outfitted catcher still has to learn the hardest job on the field: receiving, blocking, throwing, and running a pitching staff. That last one is where most youth catchers get zero help — they're guessing or relaying wristband codes. We built MAVTRAX so the coach calls pitch + location and the catcher hears it instantly in an earpiece under that new helmet: no signs to steal, no decoding, and the catcher learns sequencing by hearing a real game called all season. Free 14-day trial; the headset guide covers what goes under the helmet.
Also worth a look
 Shock Doctor BioFlex Athletic CupPart of the catcher's uniform, full stop — required by most leagues.~$11 · View on Amazon →
 COOLOMG Youth Heart-Guard Padded ShirtA padded base layer over the sternum area — popular peace of mind under youth chest protectors.~$27 · View on Amazon →
 Shock Doctor Gel Max MouthguardCheap protection a lot of catchers add under the cage — and most leagues are happy to see.~$12 · View on Amazon →
 Rawlings Glove Break-In KitThe $12 kit that turns 'break in the mitt' from a chore into a one-week project.~$12 · View on Amazon →
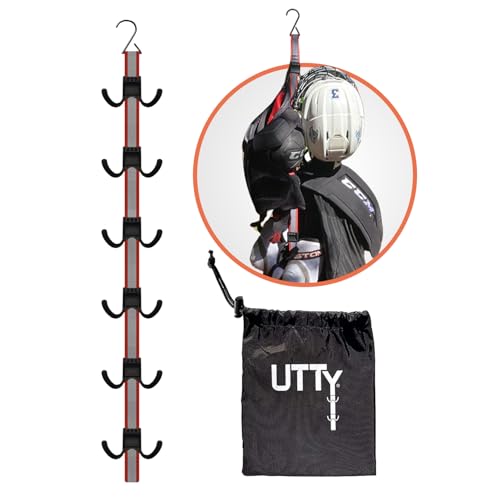 UTTY Portable Gear Drying RackThe anti-stink, gear-longevity machine — dries the whole kit overnight.~$30 · View on Amazon →
 Low-Profile IPX7 Clip SpeakerThe $15 speaker that puts coach's pitch calls under that new helmet.~$15 · View on Amazon →
FAQ
What size catcher's mitt for a 10-year-old?
Most 9–11-year-olds fit a 31"–32" youth-pattern mitt. Measure the hand and check the brand's pattern sizing — and resist buying big to 'grow into.' A mitt that fits today teaches receiving today.
Hockey-style or traditional two-piece mask?
For youth ball, hockey-style wins on sizing precision, skull/side coverage and one-motion removal. Traditional masks still have devotees at higher levels, but nearly all youth gear has standardized on hockey-style.
How do I break in a catcher's mitt fast?
Mallet work into the pocket daily, a light coat of glove conditioner (not oil-soaked), band it around a ball overnight, and as much real catch as possible. Two focused weeks gets most modern leather game-ready. Skip the oven/microwave folklore — heat wrecks leather.
How much should I budget for a full youth catcher setup?
Realistic season-one budget: $120–$200 for the set, $50–$100 for a proper youth mitt, $12 throat guard — roughly $200–$300 all-in. Add the helmet upgrade (~$80) and wheeled bag (~$80) in season two if the kid sticks at the position.
Can my kid just use the team's shared gear for the first season?
It's a fine way to test interest for a few weeks, but shared gear is sized for nobody and fits like it. If your catcher is behind the plate more than occasionally, their own properly-sized set pays off immediately in comfort, mobility and habits — and holds resale value if they switch positions next year.
What age can kids start catching?
Most leagues see kids start at 7–9, as soon as there's live pitching to catch. The position asks more than others — gear tolerance, focus, willingness to take a foul tip — so let interest lead. A kid who asks to catch and gets gear that fits usually sticks; a kid assigned to catch in loose gear usually doesn't.
Do youth catchers need a cup and heart-guard shirt too?
A cup is standard equipment for catchers everywhere and required by most leagues — treat it as part of the uniform. Padded heart-guard shirts add a layer over the sternum area and are popular with younger travel catchers; many families consider them cheap peace of mind under the chest protector. Check your league's specific requirements.
How do I get the smell out of catcher's gear?
Air it out the same night after every use — that prevents 90% of it. For gear that's already ripe: warm water with mild soap or sports-gear wash on the padding, a full air-dry in the sun, and a fabric-safe disinfectant spray. Never machine-dry padding, and never store damp gear in a sealed bag — that's how the smell becomes permanent.
We're the team behind MAVTRAX — pitch-calling software used by baseball and softball teams from 9U travel ball up. We spend our days around dugouts, gear bags and tournament weekends. Picks are chosen on specs, durability for youth-sports abuse, real-world price, and owner feedback — not on who pays the highest commission. Full criteria on how we pick.