How to Call Pitches From the Dugout: A 7-Step Method for Coaches (2026)
To call pitches from the dugout, decide the next pitch and location while the ball is on its way back to the pitcher, send it to the catcher by hand sign, wristband number or a one-way earpiece, and build each at-bat around the count and the hitter. Below is a seven-step method, the pros and cons of each way to send the call, and the sequencing basics that make the calls good.
In this guide · 8 sections
- Helmet headset
- Why call pitches from the dugout?
- How do you call pitches from the dugout, step by step?
- Hand signs, wristbands or electronic: which should you use?
- How do you sequence pitches as a coach?
- How do you keep the catcher-to-pitcher relay simple?
- How do you set up electronic calling from the dugout?
- FAQ
Key takeaways
- Decide early. The next call should be ready before the catcher throws the ball back. Thinking at the set is what makes dugout calling slow.
- Always call type and location. "Fastball away" is a plan; "fastball" is a guess. Location is half of every call.
- Three ways to send it: hand signs (free, slow, stealable), wristband numbers (faster for big menus, still visible), or a one-way earpiece to the catcher (fastest, private, allowed at many levels; check your league).
- Sequence off the count: get strike one with your most reliable pitch, expand the zone when ahead, and throw a strike you trust when behind.
- Keep the relay to the pitcher simple and give the pitcher a way to shake off without a mound visit.
- Electronic setup: a free app on the coach's phone and a ~$13 helmet-mount headset in the catcher's helmet.
Calling pitches from the dugout comes down to three habits: decide the next pitch before the ball is back to the pitcher, send it in a way the other team cannot read, and choose pitches based on the count and the hitter rather than on feel. Get those right and you speed the game up, protect a young catcher from a heavy mental load, and hold your pitchers to a real plan.
This guide is the coach's method. It starts with why you would call from the dugout at all, walks through a seven-step routine for every pitch, compares the three ways to deliver the call (signs, wristbands, audio), and finishes with the sequencing basics that decide what to call. If you want the catcher's view of calling a game, that is in how to call a baseball game.
Why call pitches from the dugout?
- You have the best information. The dugout sees spray charts, what a hitter did last at-bat, how the pitcher's breaking ball looks today and the whole defensive alignment.
- It protects young catchers. Calling a game is a lot to carry for a 12-year-old who is also receiving, blocking and throwing. Taking the call off their plate lets them catch.
- It enforces a plan. Pitch sequencing and location discipline are easier to hold when one experienced person is steering.
- It is teachable. Catchers learn calling logic fastest when they execute a coach's calls and hear the reasons between innings. Most programs hand calling to the catcher gradually as they mature.
The trade-off: a dugout call is only as good as its delivery. Slow or stolen signs cost more than a slightly worse pitch choice from the catcher.
How do you call pitches from the dugout, step by step?
Use the same seven-step routine on every pitch. It sounds mechanical; that is the point. The routine is what keeps you fast in the late innings.
- Prepare the menu before the game. Know each pitcher's usable pitches today (warmups tell you which breaking ball is working) and write down two or three hitter notes per lineup spot. Our pitch types by age guide helps keep youth menus realistic.
- Read the result of the last pitch. Was the hitter early, late, or taking? Did the pitcher hit the spot? That one observation drives the next call.
- Check the count and situation. Balls, strikes, outs, runners. A 0-2 pitch with nobody on is a different call from a 2-1 pitch with the tying run at second.
- Decide pitch and location while the ball goes back. By the time the catcher's throw reaches the pitcher, you should know the call. If you are unsure, default to your pitcher's best strike.
- Send it the same way every time. Consistency matters more than cleverness. The catcher should never have to guess whether a sign was live.
- Confirm the relay. Watch the catcher set up and give the pitcher the agreed sign. If the pitcher shakes, have your second choice ready.
- Note the outcome. Mentally (or in the app's log) note what happened so the next at-bat against this hitter starts smarter.
Hand signs, wristbands or electronic: which should you use?
Use the fastest method your league allows that the other team cannot read. Here is how the three compare.
1. Hand signs from the dugout. The coach touches a sequence of indicators (hat, belt, arm) or flashes numbers; the catcher reads it, then relays to the pitcher. It is free and allowed everywhere. It is also slow, easy to miss, and stealable by a runner or a coach watching your dugout.
2. Wristband numbers. The coach calls or flashes a three-digit number; the catcher looks it up on a laminated grid in a pitch-calling wristband. This handles big menus well and you can swap cards mid-game. The cost is that the catcher's eyes leave the field on every pitch, and a sharp opponent can start mapping numbers to pitches.
3. One-way audio to the catcher. The coach sends a spoken call ("Changeup, down and away") to an earpiece in the catcher's helmet, from a phone app or a dedicated kit. Nothing is visible, nothing needs decoding, and it is the fastest. NFHS high school baseball (since 2024), NFHS softball (since 2025) and Little League (since 2025) all allow a one-way device from a coach in the dugout to the catcher on defense; travel events vary. Check your league's current rules.
| Method | Speed | Stealable? | Catcher looks away? | Cost |
|---|---|---|---|---|
| Hand signs | Slow | Yes | Yes, to the dugout | Free |
| Wristband numbers | Medium | Over time | Yes, to the wrist | A few dollars per card set |
| Audio (app + helmet headset) | Fastest | No | No | Free app + ~$13 headset |
| Audio (dedicated hardware kit) | Fastest | No | No | $999 starter kit |
Whichever you use, keep a backup. Coaches who call electronically still teach one simple set of hand signs for the day a headset battery dies.
How do you sequence pitches as a coach?
Sequencing is choosing each pitch based on the count, what the hitter has shown, and what your pitcher can actually throw for a strike today. You do not need a scouting department to do it well. These basics cover most youth, high school and fastpitch games.
Win the first pitch. Strike one changes everything. Call the pitch your pitcher is most likely to land, usually a fastball to the glove side or down in the zone.
When ahead (0-1, 0-2, 1-2), expand. The hitter has to protect, so call pitches that start as strikes and finish out of the zone: a changeup below the knees, a breaking ball off the plate, a fastball above the hands for older hitters. Do not give in with a hittable strike on 0-2.
When behind (2-0, 3-1), throw a strike you trust. The hitter is sitting fastball. A well-located fastball on the edge or a changeup your pitcher can land is the call; a breaking ball they cannot command is a walk.
Change eye level and speed. Up then down, hard then soft. A fastball up followed by a changeup down is the simplest effective pair in youth baseball. In fastpitch, rise then drop does the same job.
Use what the hitter shows you. Late on the fastball? Stay hard and away. Out in front? Slow it down. Diving over the plate? Go in. One observation per pitch is enough.
Do not pattern yourself. If every 1-1 pitch is a changeup, a good hitter and a good opposing coach will notice. Our pitch locations explained guide covers the location vocabulary your catcher will hear.
| Count | Hitter's mindset | Typical call |
|---|---|---|
| 0-0 | Often taking or sitting fastball | Most reliable strike, glove side |
| 0-1, 0-2 | Protecting | Expand: off-speed down, fastball up or off the edge |
| 1-1, 2-2 | Balanced | Mix; avoid repeating the last pitch in the same spot |
| 2-0, 3-1 | Sitting fastball | Located strike you trust; changeup if it lands |
| 3-2 | Swinging at strikes | Pitcher's best command pitch |
How do you keep the catcher-to-pitcher relay simple?
- One relay sign. If the call reached the catcher privately (audio), the catcher only needs a single sign to the pitcher: one finger for "as called" is enough on many teams.
- A shake-off. Give the pitcher a clear shake (a glove tap or head shake) that tells you to send your second choice. Have it ready.
- A pickoff and a pitch-out. Agree one sign for each so the catcher can relay them without a visit.
- Runner on second. With visible signs, switch to your runner-on-second sequence. With audio, nothing changes, because there is nothing to read. See how to prevent sign stealing.
How do you set up electronic calling from the dugout?
You need a phone app for the caller and a helmet-mount headset for the catcher, and about 15 minutes.
- Install the app. MAVTRAX is free on iPhone, Android and the web. Add your pitchers and set each one's pitch menu.
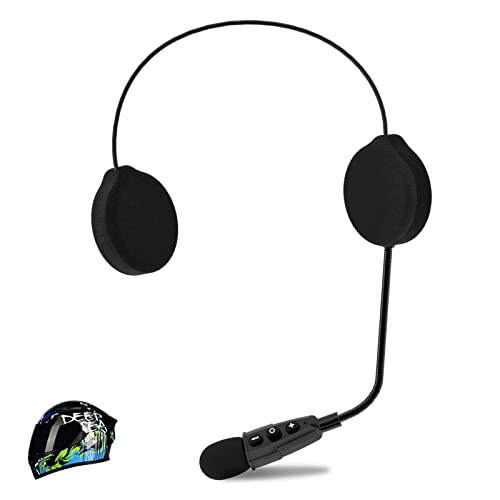
- Mount the headset in the helmet. Use a motorcycle-style helmet headset with thin velcro pods, mounted inside the catcher's helmet over one ear. Our pick is the ELIKIDSTO IPX7 helmet headset at about $13. Install steps: installing a headset in a catcher's helmet.
- Pair and test from the dugout. Call ten pitches from where you will actually stand. The catcher repeats each one back.
- Call it. Tap the pitch, tap the location; the catcher hears it in under a second. Hold Live Talk for a pitch instruction the menu cannot say ("pitch-out if he breaks early"), and keep it to pitch calls where your rules limit the device to calling pitches. Every call is logged by pitcher for review later.
Rules reminder: at NFHS and Little League levels, the caller must be in the dugout or bench area and the device is one-way to the catcher only. Travel events set their own policy. The full rules picture is in our electronic pitch calling systems guide.
FAQ
Should the coach or the catcher call pitches?
At youth levels, usually the coach, because the dugout has more information and young catchers have enough to handle. As catchers mature, many programs hand over calling gradually, starting with certain counts or innings.
What is the fastest way to call pitches from the dugout?
A one-way earpiece to the catcher, where your league allows it. The call arrives in about a second and nothing is visible. Wristband numbers are next; hand-sign sequences are slowest.
How do you call location as well as the pitch?
With audio, just say it: "Fastball, low and away." With signs, add a location sign after the pitch sign, or use wristband numbers that encode both. Always send both; location is half the plan.
Can a coach call pitches from the third-base box?
With visible signs, yes, if your team does that. With an electronic device, NFHS and Little League rules require the caller to be in the dugout or bench area. Check your league.
How do I stop the other team from stealing our dugout signs?
Use indicators that change, swap wristband cards between innings, and hide the relay. The only way to remove the risk entirely is to make the call invisible with a one-way earpiece to the catcher.
What pitch should I call on 0-2?
Usually a pitch that starts like a strike and finishes out of the zone, such as a changeup or breaking ball below the knees, or a fastball above the hands for older hitters. Avoid a hittable strike over the plate.
Do I need a hardware kit to call pitches electronically?
No. A free app on your phone and a ~$13 helmet-mount headset do the job. A dedicated kit starts at $999 and suits programs that want no phone on the bench.
We're the team behind MAVTRAX, a free pitch-calling app. This is a research guide: picks are chosen on manufacturer specs, league rules, build quality and real-world price, checked against live listings, not on who pays the highest commission. We haven't hands-on tested every product. Full criteria on how we pick.
The headset that makes it work
Every setup above ends in the catcher's helmet. These are the helmet-mount units we recommend, from our headset guide (install in 5 minutes: how-to). Live price on Amazon.